1. Adding a Microsoft Azure source to cost management
Configure your Microsoft Azure account to allow cost management access.
Configuring your Azure account to be a cost management source requires:
-
Creating a storage account and resource group
-
Configuring a Storage Account Contributor and Reader roles for access
-
Scheduling daily cost exports
|
Note
|
As non-Red Hat products and documentation can change without notice, instructions for configuring the third-party sources provided in this guide are general and correct at the time of publishing. See the Microsoft Azure documentation for the most up-to-date and accurate information. |
Add your Azure source to cost management from https://console.redhat.com/settings/sources.
1.1. Creating an Azure resource group and storage account
Cost export data is written to a storage account, which exists within a resource group. The resource group must be accessible by cost management to read the Azure cost data.
Create a new storage account in Azure to contain the cost data and metrics that cost management will collect. This requires a resource group; Red Hat recommends creating a dedicated resource group for this storage account.
|
Note
|
You must have a Red Hat account user with Sources Administrator entitlements before you can add sources to cost management. |
-
From Red Hat Hybrid Cloud Console, open the Sources menu (https://console.redhat.com/settings/sources) to begin adding an Azure source to cost management:
-
Navigate to Sources and click Add a source to open the Sources wizard.
-
Enter a name for your source and click Next.
-
Select cost management as the application and Microsoft Azure as the source type. Click Next.
-
-
Create a resource group and storage account in your Azure account using the instructions in the See Azure documentation Create a storage account.
Make a note of the resource group and storage account. They will be needed in subsequent steps.
-
In the Red Hat Hybrid Cloud Console Sources wizard, enter the Resource group name and Storage account name and click Next.
1.2. Configuring Azure roles
Red Hat recommends configuring dedicated credentials to grant cost management read-only access to Azure cost data. Configure a Storage Account Contributor and Reader role in Azure to provide this access to cost management.
-
In Azure Cloud Shell, run the following command to obtain your Subscription ID:
$ az account show --query "{subscription_id: id }" -
In the Red Hat Hybrid Cloud Console Sources wizard, enter your Subscription ID. Click Next to move to the next screen.
-
In Azure Cloud Shell, run the following command to create a cost management Storage Account Contributor role, and obtain your tenant ID, client (application) ID, and client secret:
$ az ad sp create-for-rbac -n "CostManagement" --role "Storage Account Contributor" --scope /subscriptions/{subscriptionId}/resourceGroups/{resourceGroup1} --query '{"tenant": tenant, "client_id": appId, "secret": password}' -
In the Red Hat Hybrid Cloud Console Sources wizard, enter your Azure Tenant ID, Client ID, and Client Secret.
-
In Azure Cloud Shell, run the following command to create a cost management Reader role:
$ az role assignment create --assignee "<your_Client_ID>" --role "Cost Management Reader"
-
Click Next.
1.3. Configuring a daily Azure data export schedule
Create a recurring task to export your cost data on a daily basis automatically to your Azure storage account, where cost management will retrieve the data.
|
Note
|
Cost management requires a data export from a Subscription level scope. You must create the cost data export from Subscriptions. For more information about how scopes work in Azure, see Understand and work with scopes in the Azure documentation. |
-
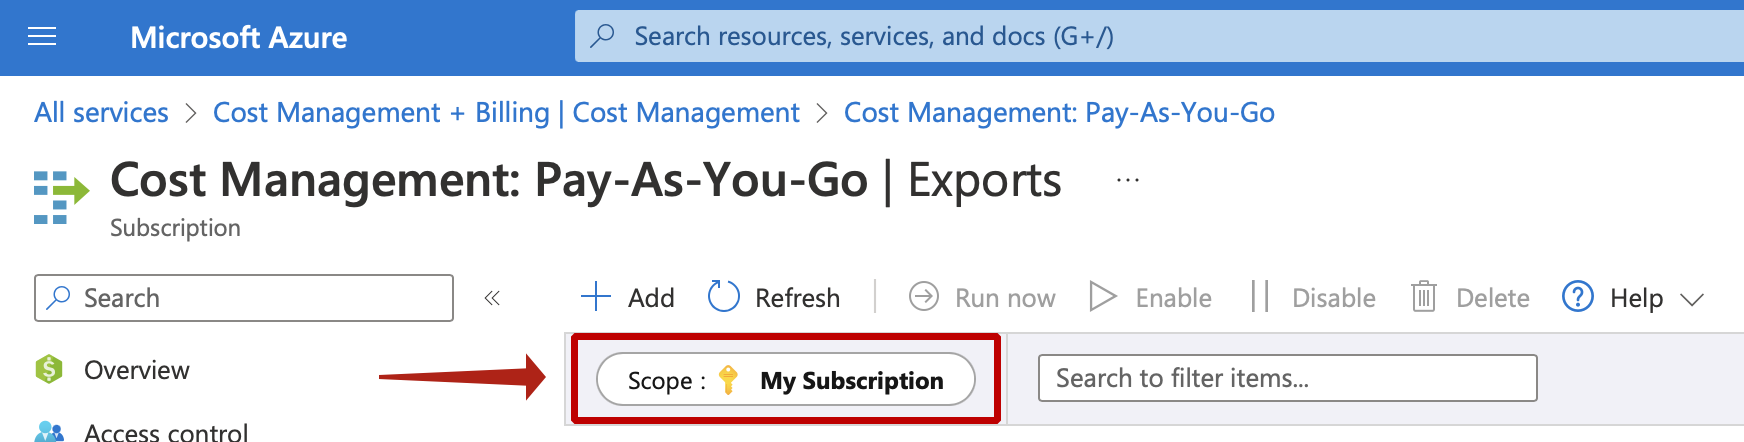
In the Azure Portal, navigate to All Services > Cost Management + Billing|Cost Management
-
Under Settings, click Exports
-
At the top of the Exports window, ensure the selected scope is a subscription, not a resource group.
-
To change the scope, click the Scope button
-
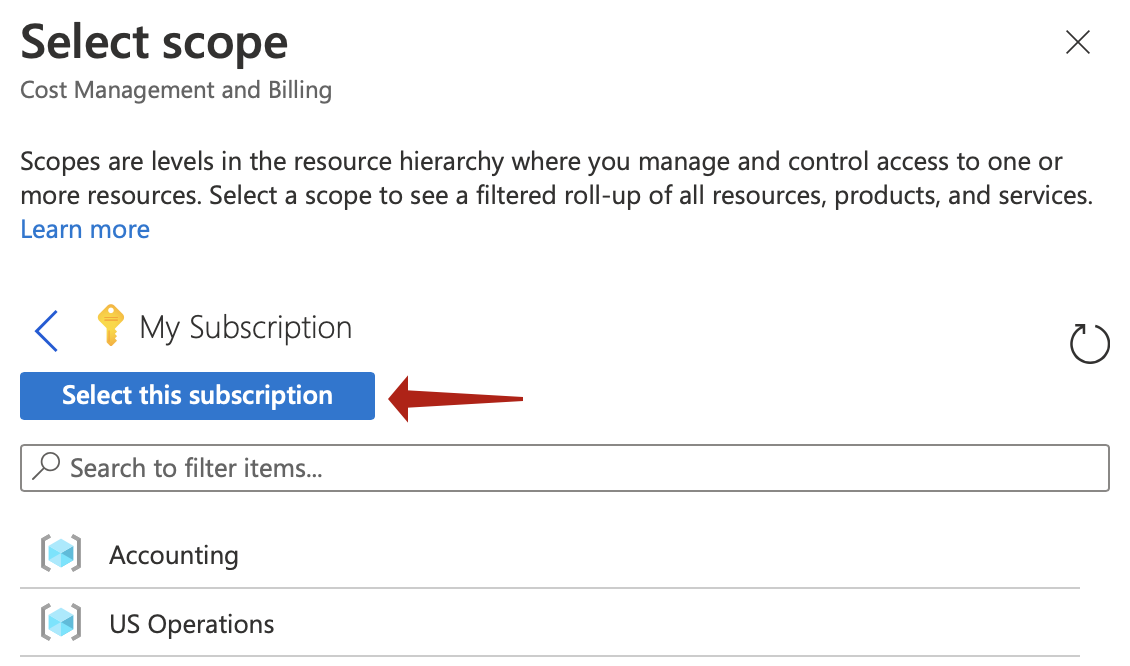
In the Select scope panel, click on the correct subscription
-
Click Select this subscription
-
Verify subscription is now set as the scope for the export
-
-
Click Add.
-
Enter any name for the export
-
For Export type, select Daily export of month-to-date costs.
-
For Subscription, select the same subscription as earlier.
-
For Storage account, select the account created earlier.
-
Enter any value for the container name and directory path for the export. These values provide the tree structure in the storage account where report files are stored.
-
-
Click Create.
-
In the Exports window, select the newly created export and click Run now to start exporting data to the Azure storage container.
-
In the Red Hat Hybrid Cloud Console Sources wizard, click Next when you have created the export schedule and review the source details.
-
Click Finish to complete adding the Azure source to cost management.
After the schedule is created, cost management will begin polling Azure for cost data, which will appear on the cost management dashboard (console.redhat.com/openshift/cost-management/).
See Create and manage exported data from the Azure documentation for more details.
2. Next steps for managing your costs
After adding your OpenShift Container Platform and Microsoft Azure sources, in addition to showing cost data by source, cost management will automatically show Azure cost and usage related to running your OpenShift Container Platform clusters on their platform.
On the cost management Overview page (console.redhat.com/openshift/cost-management/), your cost data will be sorted into OpenShift and Infrastructure tabs. From here, you can use Perspective to select different views of your cost data.
You can also use the left navigation menu to view the additional details of your costs by service.
2.1. Limit access to cost management resources
After adding and configuring sources in cost management, it is a good idea to limit access to cost data and resources. For example, you may not want users to have access to all cost data, but instead only data specific to their projects or organization. Using role-based access control, you can limit the visibility of resources involved in cost management reports. For example, you may want to restrict a user’s view to only AWS sources, rather than the entire environment.
For more information about limiting access see, Limiting access to cost management resources.
2.2. Configure tagging for your sources
The cost management application tracks cloud and infrastructure costs using tags (called labels in OpenShift), which you can refine to filter and attribute to resources. Tags in cost management allow you to organize your resources by cost and to allocate the costs to different parts of your cloud infrastructure.
|
Important
|
Tags and labels can only be configured directly on a source. While you can choose what tags are activated in cost management, you cannot edit tags and labels in the cost management application. |
See Managing cost data using tagging to learn more about:
-
Planning your tagging strategy to organize your view of cost data.
-
Understanding how cost management associates tags.
-
Configuring tags and labels on your sources.
2.3. Configure cost models to accurately report costs
Now that you have configured your sources to collect cost and usage data into cost management, you can configure cost models to associate prices to metrics and usage, and fine-tune the costs of running your cloud.
A cost model is a framework used to define the calculations for the costs stored in cost management, using raw costs and metrics. Costs generated by a cost model can be recorded, categorized and distributed to specific customers, business units or projects.
From the Cost Models area of cost management, you can:
-
Classify your costs as infrastructure or supplementary costs.
-
Capture monthly costs for OpenShift nodes and clusters.
-
Apply a markup to account for additional support costs.
-
Learn how to configure a cost model in Using cost models.
2.4. Use the Cost Explorer to visualize your costs
The cost management Cost Explorer allows you to create custom graphs of time-scaled cost and usage information to better visualize and interpret your costs.
See Visualizing your costs using Cost Explorer to learn more about:
-
Using Cost Explorer to identify abnormal events.
-
Understanding how your cost data changes over time.
-
Creating custom bar charts of your cost and usage data.
-
Exporting custom cost data tables.
Providing feedback on Red Hat documentation
We appreciate your feedback on our documentation. To provide feedback, highlight text in a document and add comments.
-
You are logged in to the Red Hat Customer Portal.
-
In the Red Hat Customer Portal, the document is in the Multi-page HTML viewing format.
To provide your feedback, perform the following steps:
-
Click the Feedback button in the upper-right corner of the document to see existing feedback.
NoteThe feedback feature is enabled only in the Multi-page HTML format. -
Highlight the section of the document where you want to provide feedback.
-
Click the Add Feedback pop-up that appears near the highlighted text.
A text box appears in the feedback section on the right side of the page.
-
Enter your feedback in the text box and click Submit.
A documentation issue is created.
-
To view the issue, click the issue link in the feedback view.