1. Using cost models
You can use cost models in cost management to apply a price to usage in your hybrid cloud environment, then distribute the costs to resources.
1.1. What is a cost model?
It can be difficult to find out the real cost of cloud-based IT systems. Different sources provide a variety of cost data and metrics, which can be complicated to calculate together and accurately distribute the costs.
A cost model is a framework used to define the calculations for the costs stored in cost management. Using a cost model, you can associate a price to metrics provided by your sources to charge for utilization of resources.
In some cases, those costs are related to the raw costs of the infrastructure, while others will be based on a price list that associates usage to costs. The data must be normalized before you can add a markup to it to cover your overhead, and then distribute the charges to your resources or end customers. It helps to align costs to utilization: those customers that use a resource more will be charged more.
1.2. Cost model concepts
These terms and concepts are important for understanding cost management’s cost model workflow.
- Cost model
-
A cost model is a framework used to define the calculations for the costs stored in cost management, using raw costs and metrics. The cost model is used for budgeting and accounting, and also the visualization and analysis of costs — in cost management, it provides the basis for the cost information that the user will view. Costs generated by a cost model can be recorded, categorized and allocated to specific customers, business units or projects.
1.2.1. Cost layers
Costs can be created at different layers of the environment. In cost management, all costs can be classified as either infrastructure or supplementary costs (including your costs that are not identified as infrastructure). In your cost model, you can choose to allocate and present your costs as any of those cost layers. As a result, you can customize what cost management shows on each details page.
- Infrastructure cost
-
This cost can come from two different sources:
-
Costs directly reported by a cloud provider, through an Amazon (AWS) Cost and Usage Report, Microsoft Azure or Google Cloud export. In the current version of cost management, all cloud costs are considered infrastructure costs.
-
Costs calculated from a price list for rates specifically marked as infrastructure.
NoteOpenShift Container Platform node and cluster cost per month rates are classified as infrastructure cost by default, but can be optionally classified as supplementary.
-
- Supplementary cost
-
All costs not directly attributed to infrastructure are identified as supplementary costs. In the current version of cost management, these costs come from applying a price list to metrics obtained from an OpenShift cluster. The rates in the price list must be specified as supplementary. This is the default for all OpenShift costs except node and cluster cost per month.
1.2.2. Cost model terminology
- Cost
-
The sum of infrastructure and supplementary costs. This can be thought of as the "total cost" for the filtered data being shown (for example, cost for a particular account, region, or service).
- Raw cost
-
The costs reported by a cloud provider without any cost model calculations applied.
- Markup
-
The portion of cost calculated by applying markup or discount to infrastructure raw cost in the cost management application.
Example: For a raw cost of $100 and a markup of 10%, the markup would be $10, and the cost would be $110 (sum of both).
- Usage cost
-
The portion of cost calculated by applying hourly or monthly price list rates to metrics.
Example: For a metric of 100 core-hours and a rate of $1/core-hour, the usage cost would be $100.
- Monthly cost
-
The portion of cost calculated by applying monthly price list rates to metrics returned as part of usage cost. Monthly cost can be configured for OpenShift nodes or clusters in a cost model to account for subscription costs, for example.
Monthly costs are currently shown as part of the usage costs in the cost management API and interface.
NoteThese costs are not currently amortized over the reported period in the API, so when viewing a daily breakdown of cost, monthly costs will only show on the first of the month.
Example: For an OpenShift cluster with 10 nodes at a rate of $10,000 per node per month, the monthly cost would be $100,000.
- Price list
-
A list of rates used within the application’s cost model to calculate the usage cost of resources.
- Distributed costs
-
The costs calculated by the cost model are distributed to higher level application concepts, such as project, account, service, and so on. How the costs are distributed depends on the cost type (infrastructure or supplementary) assigned in the cost model.
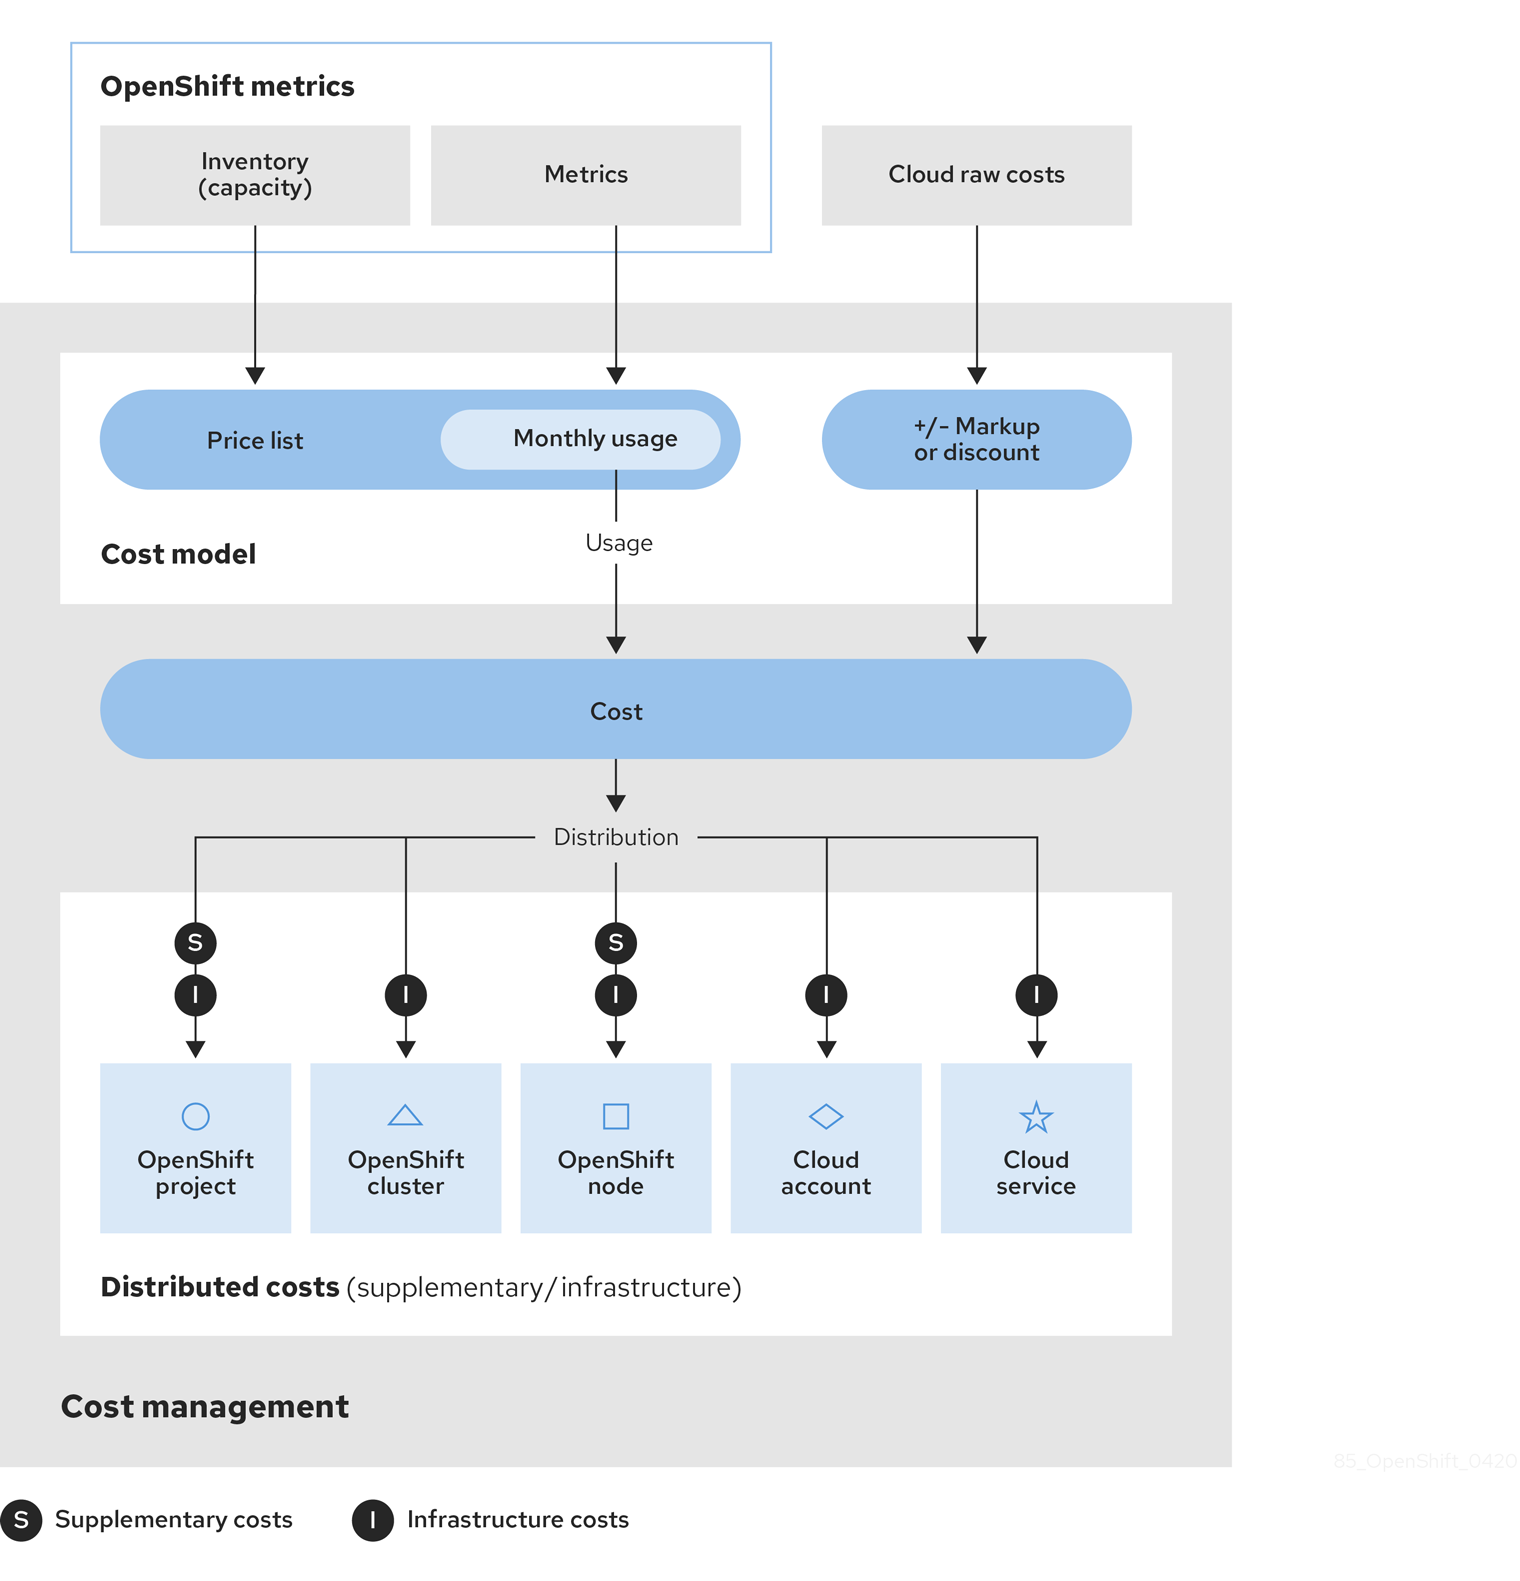
1.3. The cost model workflow
The following diagram shows the cost model workflow that cost management uses to apply a price to metrics and inventory, normalize cost data from different sources, apply a markup (or discount), then distribute the costs across the relevant resources.
The cost model also helps differentiate raw costs from the costs used in cost management.
-
Cost management collects cost data from several sources:
-
Inventory - A list of all resources that are or were running in your source, whether they are presently in use or not. For example, if your OpenShift Container Platform environment contains a node that is not in use, that node still costs $x amount per month. There are several ways of collecting inventory data into cost management: cost management can generate inventory from the AWS Cost and Usage Report, Azure or Google Cloud export, or OpenShift Metering Operator reports.
-
Metrics - A subset of the OpenShift inventory showing usage and consumption for each resource.
-
Cloud raw costs - AWS, Azure, and Google Cloud provide regular reports to cost management listing consumption of resources and their costs, which cost management uses for calculations. As a result, configuring a custom price list is not necessary for cloud sources.
-
-
The cost model allows you to apply a markup or discount of your choice to account for other costs and overhead, and provides options for assigning a cost layer (infrastructure or supplementary) to costs:
-
For OpenShift Container Platform sources - Since the metrics and inventory data do not have a price assigned to usage, you must create and assign a price list to your sources to determine the usage cost of these resources. A price list includes rates for storage, memory, CPU usage and requests, and clusters and nodes.
-
For AWS, Azure, and Google Cloud sources - You can create cost models for these sources to account for any extra costs or overhead in your environment by applying a markup percentage, or a negative percentage to calculate a discount.
-
-
Costs from sources are then collected together and allocated as infrastructure cost and supplementary cost.
-
The cost is then distributed to resources across the environment. Depending on your organization, these resources may include OpenShift projects, nodes, or clusters, and cloud source services or accounts. You can also use tagging to distribute the costs by team, project, or group within your organization.
|
Note
|
For more information about configuring tagging for cost management, see Managing cost data using tagging. |
2. Setting up a cost model
Configure cost models in cost management based on your requirements.
2.1. Applying a markup or discount to cloud sources
Create a AWS, Azure, or Google Cloud cost model to apply a markup or discount to your cloud infrastructure costs.
As cloud infrastructure sources (AWS, Azure, or Google Cloud) collect cost and usage data into cost management with prices already assigned, you only need to assign a markup or discount (if desired) to accurately reflect your costs.
Adding a markup to your raw costs can allow you to account for your overhead costs, such as the cost of administering your AWS account, Azure subscription, or other support costs. A markup is an estimation to cover your costs not shown by metrics or usage.
This example shows how to add a 10% markup to the information collected from the AWS Cost and Usage Reports. The same method can be used to apply a markup or discount to your Azure or Google Cloud costs.
|
Note
|
Creating, editing, or deleting a cost model only updates calculations starting from the first day of the current month. |
-
A user with Cost Administrator or Cost Price List Administrator permissions. See Limiting access to cost management resources in Getting started with cost management for instructions on configuring user roles.
-
Your AWS account added to cost management as a data source. See Adding an Amazon Web Services (AWS) source to cost management in Getting started with cost management for instructions.
-
From the Cost models menu, click Create cost model to open the cost model wizard.
-
Enter a name and description for the cost model, and select Amazon Web Services (AWS) as the source type to apply the cost model to. Click Next.
-
To apply a 10% markup to the base costs of your resources, enter 10 in the as the Markup rate and click Next.
Note-
To apply a discount rather than a markup, enter a minus sign with the value (for example, -15).
-
If you do not want to apply a markup or discount, enter 0.
-
-
Select one or multiple AWS sources to assign the cost model to and click Next. Selecting a source with a cost model already assigned will override its previous cost model. You can also assign sources to your cost model at a later time.
-
Review the cost model details, and click Create.
-
Click Close to exit the cost model wizard.
Your new cost model will appear in the list on the Cost models page.
-
From the Cost models summary page, you can review information about your cost models, including:
-
The source type the cost model was created for
-
The number of sources assigned to the cost model
-
The date the cost model was last modified
-
-
To see more information, assign, or edit a cost model:
-
From the Cost models summary page, click a cost model name to bring up the details page where you can edit the cost model, including source assignments, markup, and other Settings.
-
-
To delete a cost model:
-
From the Cost models summary page, click
 (more options), then Delete.
-
-
Review your tags and tagging strategy to ensure that costs are being distributed to the correct resources, cost centers, or teams. See Managing cost data using tagging for more information.
2.2. Creating a cost model for an OpenShift Container Platform cluster
As metrics and inventory from OpenShift Container Platform sources do not have costs associated, you must create a cost model to associate a price to resources.
Creating a cost model for an OpenShift source includes assigning prices for usage and requests using CPU, memory, node, cluster, storage, or persistent volume claim metrics, and applying a markup or discount to determine the total costs of your OpenShift infrastructure. You can also use tags to measure costs for specific parts of your infrastructure, such as various storage methods, giving you greater control over your individual requirements. See Managing cost data using tagging for more information about tagging in cost management.
This example shows how to design and apply a cost model for an OpenShift Container Platform cluster on cloud infrastructure (for example, AWS or Azure). The cloud infrastructure costs are seen in cost management as part of the cluster cost, so creating a cost model allows you to distribute the underlying infrastructure cost to accurately reflect the costs of running the cluster.
|
Note
|
Creating, editing, or deleting a cost model only updates calculations starting from the first day of the current month. |
-
A user with Cost Administrator or Cost Price List Administrator permissions. See Limiting access to cost management resources in Getting started with cost management for instructions on configuring user roles.
-
Your OpenShift cluster added as a cost management data source. See Adding an OpenShift Container Platform source to cost management in Getting started with cost management for instructions.
-
From the Cost Models menu, click Create cost model to open the cost model wizard.
-
Enter a name and description for the cost model, and select OpenShift Container Platform as the source type to apply the cost model to. Click Next.
-
Create a price list so you can assign rates to usage or requests. cost management collects these metrics from OpenShift but there is no cost attached to them in cost management until you apply a cost model. You can also create your price list later.
-
To apply a monthly node cost of $1,000:
-
Click Create rate.
-
For Metric, select Node.
-
For Measurement, select Count (node-month).
-
cost management classifies node and cluster costs as infrastructure costs by default. To change the cost type you are calculating, select it under Calculation type. See Cost layers to learn more.
-
In the Rate field, enter 1000 to assign a $1,000 per price to each node in the sources you select (in a later step).
-
Click Create rate to save the node rate.
-
-
To apply a rate to CPU requests:
-
For Metric, select CPU.
-
For Measurement, select Request (core-hours).
-
cost management classifies metrics-based data such as CPU requests as supplementary costs by default. To change the cost type you are calculating, select it under Calculation type. See Cost layers to learn more.
-
In the Rate field, enter 0.09 to apply a $0.09 cost to each core-hour of CPU requests.
-
Click Create rate to save the CPU request rate.
-
-
To apply tag-based rates to persistent volume claims:
-
Click Create rate.
-
For Metric, select Persistent volume claims.
-
For Measurement, select Count (pvc-month).
-
cost management classifies persistent volume claim rates as infrastructure costs by default. To change the cost type you are calculating, select it under Calculation type. See Cost layers to learn more.
-
Select Enter rate by tag.
-
Enter a tag key in the Filter by tag key field.
-
Enter a Tag value and Rate. You can select Default to specify a rate as default for that tag key.
Note-
Specifying a default rate will apply that rate to all tag values for the corresponding tag key that are not defined. You can enter a rate of 0 for any tag value that you do not want the default rate applied to.
-
-
Click Add more tag values to add as many tag values as you require.
-
Click Create rate to save the persistent volume claim rates.
-
-
Add additional rates by repeating the previous steps, or click Next to finish configuring your price list.
-
-
If desired, set a markup or discount. To apply a 10% markup to the base costs of your resources, enter 10 in the as the Markup rate and click Next.
Note-
To apply a discount rather than a markup, enter a minus sign with the value (for example, -15).
-
If you do not want to apply a markup or discount, enter 0.
-
-
Select one or multiple OpenShift sources to assign the cost model to and click Next. Selecting a source with a cost model already assigned will override its previous cost model. You can also assign sources to your cost model later.
-
Review the cost model details, and click Create.
-
Click Close to exit the cost model wizard.
Your new cost model will appear in the list on the Cost models page.
-
From the Cost models summary page, you can review information about your cost models, including:
-
The source type the cost model was created for
-
The number of sources assigned to the cost model
-
The date the cost model was last modified
-
-
To see more information, assign, or edit a cost model:
-
From the Cost models summary page, click a cost model name to bring up the details page where you can edit the cost model, including source assignments, price list, markup, and other Settings.
-
-
To delete a cost model:
-
From the Cost models summary page, click
(more options), then Delete.
.
-
-
Review your tags and tagging strategy to ensure that costs are being distributed to the correct resources, cost centers, or teams. See Managing cost data using tagging for more information.
Providing feedback on Red Hat documentation
We appreciate your feedback on our documentation. To provide feedback, highlight text in a document and add comments.
-
You are logged in to the Red Hat Customer Portal.
-
In the Red Hat Customer Portal, the document is in the Multi-page HTML viewing format.
To provide your feedback, perform the following steps:
-
Click the Feedback button in the upper-right corner of the document to see existing feedback.
NoteThe feedback feature is enabled only in the Multi-page HTML format. -
Highlight the section of the document where you want to provide feedback.
-
Click the Add Feedback pop-up that appears near the highlighted text.
A text box appears in the feedback section on the right side of the page.
-
Enter your feedback in the text box and click Submit.
A documentation issue is created.
-
To view the issue, click the issue link in the feedback view.